Building your own campervan can be exciting, but knowing how to put it together is key. Many DIY enthusiasts turn to pocket hole construction for its strength, speed, and simplicity.
This guide will walk you through everything you need to know about using pocket hole construction, to create a sturdy, long-lasting campervan.
From tools and materials to step-by-step instructions, you’ll get all the tips to start your van build today.
What is Pocket Hole Construction?
Definition and Basic Principles
Pocket hole joinery is a method where you drill angled holes (usually 15°) into one piece of wood. Then, you insert self-tapping pocket screws into these holes to connect the two pieces.
The technique had been around for years, but in the 1980s, Craig Sommerfeld, a tool and die maker was making his kitchen cabinets and needed a more efficient way to face the cabinets using something stronger than nails.
Using pocket holes creates tight, hidden joints that are both strong and neat. So he designed a simple tool that helped him produce a repeatable, precise hole.
Craig’s tool became the Kreg Jig, pocket hole tool.
Advantages for Campervan Builds
If you fancy using a Pocket hole construction for your DIY van projects, there are loads of advantages:
- Strong joints that handle weight and movement
- Fast assembly, saving time
- Easy for beginners to learn and do
- Less need for clamps and complicated tools
Imagine building a sturdy cabinet or framing walls without fuss AND automatically hiding the heads of all the screws. Pocket holes give you that flexibility.
Limitations and Considerations
But, this method isn’t perfect for everything. Pocket holes don’t always work well with thinner timber. It’s best to make sure your timber is thicker than 10-12mm.
Also, softer woods might not hold screws well. So, stick to plywood, hardwood, or thicker panels to get better results.
Essential Tools and Materials for Pocket Hole Construction
Tools Needed
To get started, you’re gonna need a few tools:
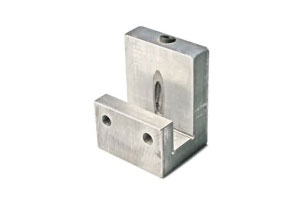
- Pocket hole jig (like a Kreg Jig) — the main piece that makes drilling perfect holes easy
- Power drill and matching drill bits
- Clamps — to hold the wood in place while you drill the holes
- Square — for accurate angles
- Measuring tape — for precise cuts
Materials Required
Next, choose your building materials:
- Plywood or hardwood sheets — lightweight but durable
- Pocket hole screws — special screws designed for this joinery
- Wood glue (optional) — for extra strength
Tips for Choosing the Right Tools and Materials
For beginners, good quality tools save frustration.
Kreg offers beginner-friendly jigs that are sturdy and simple to use.
When picking wood, opt for plywood that’s at least 12mm thick for added durability. For weight savings, consider thinner plywood for any interior/back panels.
Step-by-Step Guide to Building with Pocket Holes
Planning and Design
Start with clear plans. Measure your van’s interior details. Sketch out where cabinets, walls, and beds will go. Using paper templates, or digital tools can make it easier. Planning helps avoid mistakes later.
Cutting and Preparing Materials
Cut your plywood or wood panels to size.
It’s important to get straight edges when using pocket hole construction. So, if you have access to a table saw, or even a circular saw it’s much easier to get straight cuts.
And, always double-check your measurements before cutting. Proper measurements reduce waste and errors 🙂
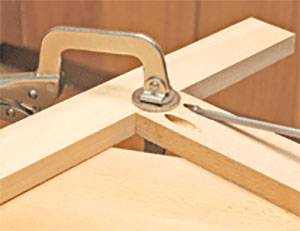
Drilling Pocket Holes
- Adjust the jig for the correct hole spacing.
- Set up your jig on the piece you want to join.
- Use the correct drill bit size, and clamp the wood firmly.
- Drill the holes at the designated spots, keeping safety in mind.
Assembling and Joining
Line up your pieces accurately. Apply a little wood glue if you want extra hold. Drive the screws into the pocket holes. Use clamps to keep pieces aligned while screws tighten. Then, Let the glue dry.
Finishing the Joints
Sand down any rough edges around the joints. Then, finish with paint, stain, or sealant to protect your wood from moisture and wear.
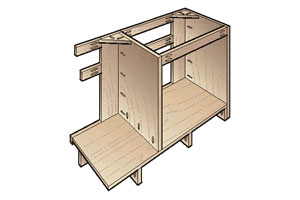
Building Specific Structures
You can use pocket holes to assemble walls, cabinets, beds, and even shelves. For example, for a cabinet, join the sides, top, and bottom panels with pocket screws.
When framing, it’s simple to secure studs and supports quickly.
Troubleshooting: If a joint feels loose, check the screw depth and spacing between screw holes. Re-drilling, or adding more screws can help.
If you have a few minutes, here’s a really helpful YouTube video from Bailey Line Road…
Tips and Best Practices for a Successful DIY Campervan Build
Improving Joinery Strength and Longevity
Always add a bit of wood glue between the joints. If practical, space the screws at least 50mm apart, to avoid splitting. And finally, tighten screws fully, but avoid over-tightening them.
Ensuring Precision and Accuracy
Measure twice, drill once. Use a square to keep corners perfect. And, regularly check that everything is level and aligned as you build.
Safety and Maintenance
Remember to handle power tools carefully. Always wear eye protection and work in a well-ventilated area. Regularly inspect joints during construction for signs of weakness or damage.
Cost-Effective Strategies
Reuse scrap wood for small parts and test pieces. Buy screws and tools in bulk for savings. Look for sales, or second-hand tools to cut costs.
Real-World Examples
Many DIY van builders rely on pocket holes for cabinets, framing, and furniture.
One recent campervan conversion used pocket holes to assemble a fold-out bed frame that’s both light and sturdy. Another project built kitchen cabinets using pocket screws, which simplified the process and saved time.
Lessons learned from experienced builders show that patience pays off. Double-check measurements, and don’t rush the assembly. Visual examples can be found online in forums and video tutorials.
Conclusion
Pocket hole construction is a perfect tool for building a strong, quick, and easy campervan interior.
It’s perfect for cabinets, framing, and furniture in your van conversion. With a few simple tools and some planning, you can create a cozy, durable home on wheels.
Start small — plan your design carefully, gather your tools, and take your time.
Enjoy the process and see your dream campervan come together piece by piece. Now, gather your tools, sketch your plan, and begin building the van of your dreams!

As a full-time carer, I’m not a ‘true’ vanlifer! But, I do spend a lot of my free-time travelling to and staying in different towns and villages around the UK. I enjoy the freedom and control that staying in my van gives me, and I want to share that experience with anyone else who’s thinking about giving it a go.