5 DIY Campervan Projects to Try This Weekend: Transform Your Van Affordably and Creatively
Introduction
Van life has become increasingly popular in recent years. More people want to explore the outdoors, enjoy freedom, and customise their living space. A campervan isn’t just a way to travel — it’s a home on wheels. Making it personal and comfortable can be a fun challenge.
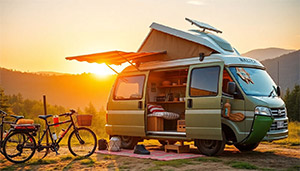 DIY van upgrades save money, make your van unique, and give you a real sense of pride. Spending a weekend on small projects can vastly improve your space without breaking the bank. Recent surveys show more new van owners are choosing to build and upgrade their vehicles themselves.
This article will inspire you with five simple, practical projects to tackle over a weekend. They’ll help you organise better, stay comfy in different seasons, and add your personal touch to the space. Ready to get started?
Improving Storage Solutions for a Clutter-Free Van
Optimising Vertical Space with Shelves and Hooks
Limited space is a common challenge in a campervan. Using vertical space allows you to keep things tidy and accessible. Light shelves made of wood or tough plastic can hold dishes, books, or clothes. Secure sturdy hooks underneath shelves or on walls for hanging pots, utensils, or even jackets.
A simple shelf upgrade can make a big difference. For instance, installing a small corner shelf near your bed keeps essentials close at hand. Hooks add hanging storage without taking up floor area. With just a few screws, you can turn a messy van into an organised home.
Building Under-Bench Storage Compartments
Under the seats or benches hides plenty of space waiting to be used. You can create custom storage compartments with basic tools and materials. Start by measuring under your bench seat. Then build a box with strong plywood that fits perfectly.
Use clear plastic bins inside to see your items easily. Secure the bins with Velcro or bungee cords to prevent sliding during drives. Remember to think about safety — don’t overload. This project keeps clutter out of sight and makes packing much easier.
Installing Overhead Cabinets
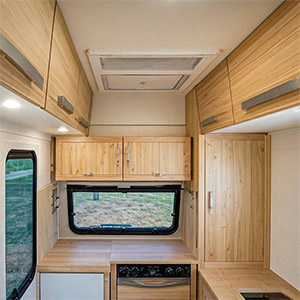 Overhead cabinets are perfect for storing lightweight yet bulky items like clothes or bedding. Building them yourself saves money and allows custom sizing. Use simple woodworking techniques, like cutting and screwing plywood panels.
Begin by marking where the cabinets will hang. Drill pilot holes for screws and attach the panels to a sturdy frame. Pay attention to weight limits — don’t overload upper cabinets. Interior design experts recommend bright colours and simple handles to make small spaces appear larger.
Enhancing Insulation for Comfort in All Seasons
Choosing the Right Insulation Materials
Seasons change quickly — your van should stay warm in winter and cool in summer. Picking the right insulation depends on your needs. Foam board insulates well and is easy to cut. Spray foam fills gaps best and adds maximum R-value. Reflective or thermal foil insulations keep heat out in summer and trap warmth in winter.
Think about your van’s weight and how tricky installation might be. Lightweight options work better if you plan to keep the van mobile. The right material improves comfort and reduces energy use.
DIY Insulation Installation Tips
Start by removing the interior panels. Clean surfaces to ensure good adhesion. Cut insulation panels to fit walls, ceiling, and floors. Use spray foam or adhesive to hold them in place. Seal gaps with weatherstripping or foam sealant for extra efficiency.
Avoid common mistakes, like leaving gaps or not securing insulation properly. These can cause heat loss or cold spots. For example, upgrading insulation can cut interior temperature swings by half, making cold trips warmer.
Sealing Air Leaks for Better Energy Efficiency
Air leaks waste energy and make your van harder to heat or cool. Check around windows, doors, and vents for drafts. Use weatherstripping or foam tape to block leaks. Seal small cracks with sealant designed for outdoor use.
Proper sealing means your heating and cooling systems won’t work overtime. It also keeps bugs and dust out. Experts agree that sealing gaps can improve overall energy efficiency and comfort significantly.
Customising the Interior with Built-In Furniture
Creating a DIY Foldaway Bed or Murphy Bed
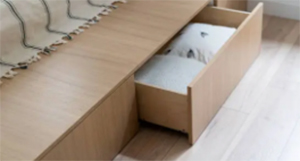
Sleeping space is the heart of any campervan. A foldaway or Murphy bed saves space during the day. Use hinges, sturdy wood, and foam mattresses to build a bed that folds up or slides into a cabinet.
You can even incorporate storage into the bed frame to store bedding or clothes. When you’re finished, fold it down for a cosy sleeping area. This project makes full use of limited space and keeps your van multipurpose.
Constructing a Multi-Functional Table
A foldable or extendable table boosts your van’s versatility. It can serve as a dining zone, desk, or workspace. Use lightweight wood and simple hinges for easy assembly. Attach the table to the wall with fold-down brackets.
Follow step-by-step instructions to build your custom table. Many van life bloggers share videos demonstrating quick and durable designs. The right table makes your van feel more like a home and is perfect for working or relaxing.
Adding Built-In Seating with Storage
 Benches that double as storage are essential space savers. Use sturdy cushions for comfort, and build a box frame underneath to hold things like tools, blankets, or food. Upholster with durable, washable fabrics to survive travel bumps.
Smart design can include lift-up seats for easy access to stored items. It keeps clutter out of sight and adds some style. Space optimisation like this transforms your van into a neat, relaxing haven.
Installing Eco-Friendly Power Solutions
Simple Solar Panel Installations
Solar panels are a handy upgrade for independent van life. They turn sunlight into free energy to power lights, fridges, or phones. Many DIY solar kits come with all you need, making installation simple.
Start with a flat rooftop space, attach mounting brackets, and connect panels to a charge controller and battery. Many tutorials walk you through wiring step by step. Cost-effective and eco-friendly, solar keeps you off-grid longer.
Building a Battery Storage System
A good battery system guarantees power when sunlight isn’t enough. Use deep-cycle 12V batteries to store energy. Connect batteries safely with thick wires, and add fuses for protection.
Portable battery banks are a quick backup, especially for emergencies. Be cautious with wiring — correctness is key for safety. Having a reliable power system lets you enjoy independence without worry.
Incorporating Energy-Efficient LED Lighting
LED lights consume less power and last longer. Pick fixtures that suit your space, such as strip lighting or puck lamps. Simple wiring with plug-and-play connectors makes installation straightforward.
LEDs help you save energy and extend battery life. Many van owners report cost savings and better lighting ambiance with LEDs. Bright, low-power lighting makes your van feel welcoming and functional day or night.
Personalising with Decor and Functional Accessories
Crafting Custom Window Coverings
Privacy and temperature control are easy with DIY window coverings. Use blackout curtains or reflective solar shades. Sew your own with simple fabric, or buy extra-large sheets for instant covers.
Secure them with velcro, hooks, or magnets. They block out light when sleeping and keep the heat in during cold nights. Custom covers add style and comfort, making your van feel more like a home.
Creating a Portable Camp Kitchen
A mobile kitchen allows outdoor cooking anywhere. Build a compact, pull-out unit with storage for utensils, pots, and cleaning cloths. Use lightweight materials like aluminium or plastic panels.
Include a fold-out countertop and small gas stove for easy outdoor meals. With everything in one place, cooking becomes less hassle. Your van will be ready for adventure and good meals on the go.
Adding Homely Touches
Personal touches turn a van into a cosy space. Add small plant boxes or plant pots for a touch of nature. Display favourite photos or artwork on the walls. Use colourful cushions, rugs, and fairy lights for warmth.
These small decor choices make your van feel inviting and uniquely yours. They boost comfort and make every journey special.
Conclusion
Tackling these five DIY campervan projects can dramatically improve your travelling home. From smarter storage and insulation to custom furniture and power setups, each upgrade adds comfort and personality.
Start with manageable projects, and build on your skills as you go. Remember to document your progress and share your ideas with others. DIY campervan renovations not only improve your adventure but also give you pride and joy in creating a space you love. Happy building!

As a full-time carer, I’m not a ‘true’ vanlifer! But, I do spend a lot of my free-time travelling to and staying in different towns and villages around the UK. I enjoy the freedom and control that staying in my van gives me, and I want to share that experience with anyone else who’s thinking about giving it a go.